Getting Started with BidX: A Quick Start Guide & What to Expect
1. Introduction and overview
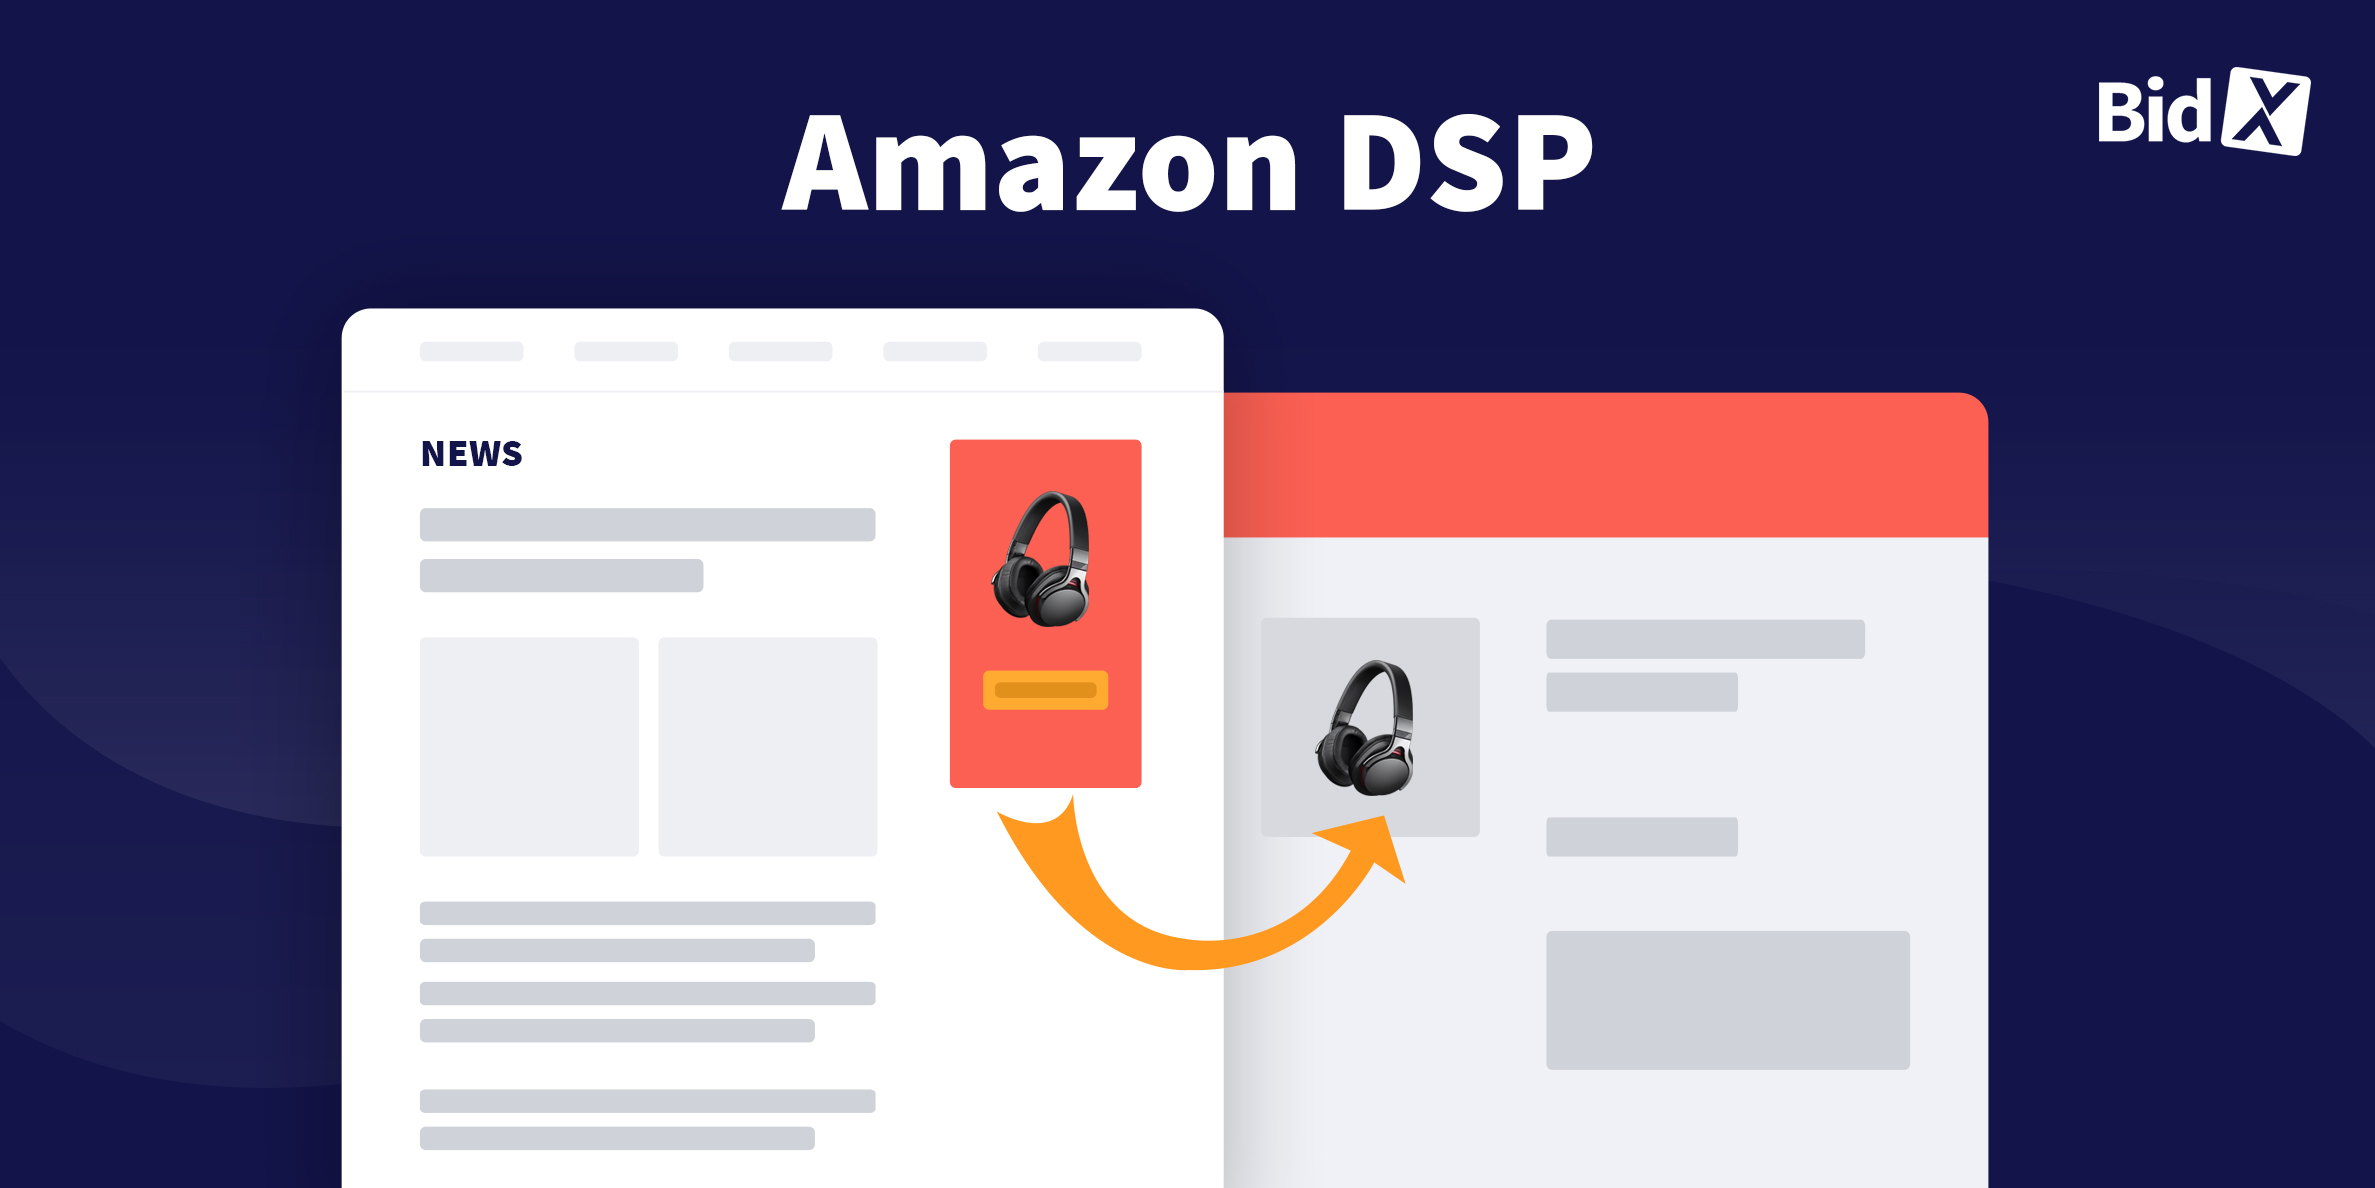
With BidX, Amazon retailers save money and generate more profitable sales by fully automating Amazon Advertising. BidX follows the approach of providing everything you need to advertise on Amazon in terms of features, support and knowledge so that you can get the most out of your Amazon advertising.
BidX also offers a free audit for anyone interested. During this time, we work together to define clear objectives, and their current state.
Tip: If after registration you did not receive a confirmation mail, please check the spam folder. If you can' t find a mail there, please contact the support via the chat in the lower right corner.
The tool is essentially structured in three areas:
- Dashboard,
- Management and
- Discover.
The dashboard provides a general overview of your account and its current performance. The management part is the heart of our tool. All settings for automation are made here. Discover offers an overview of all Amazon campaigns, from marketplace to keyword list. You can also edit campaigns manually here.
2. Setup
After registration you will be guided step by step through the setup of your account. Now you can connect the main interfaces to Amazon and load your data directly. At first, we only load your performance data from the last 7 days. It will take about 30 minutes for all performance data to be uploaded.
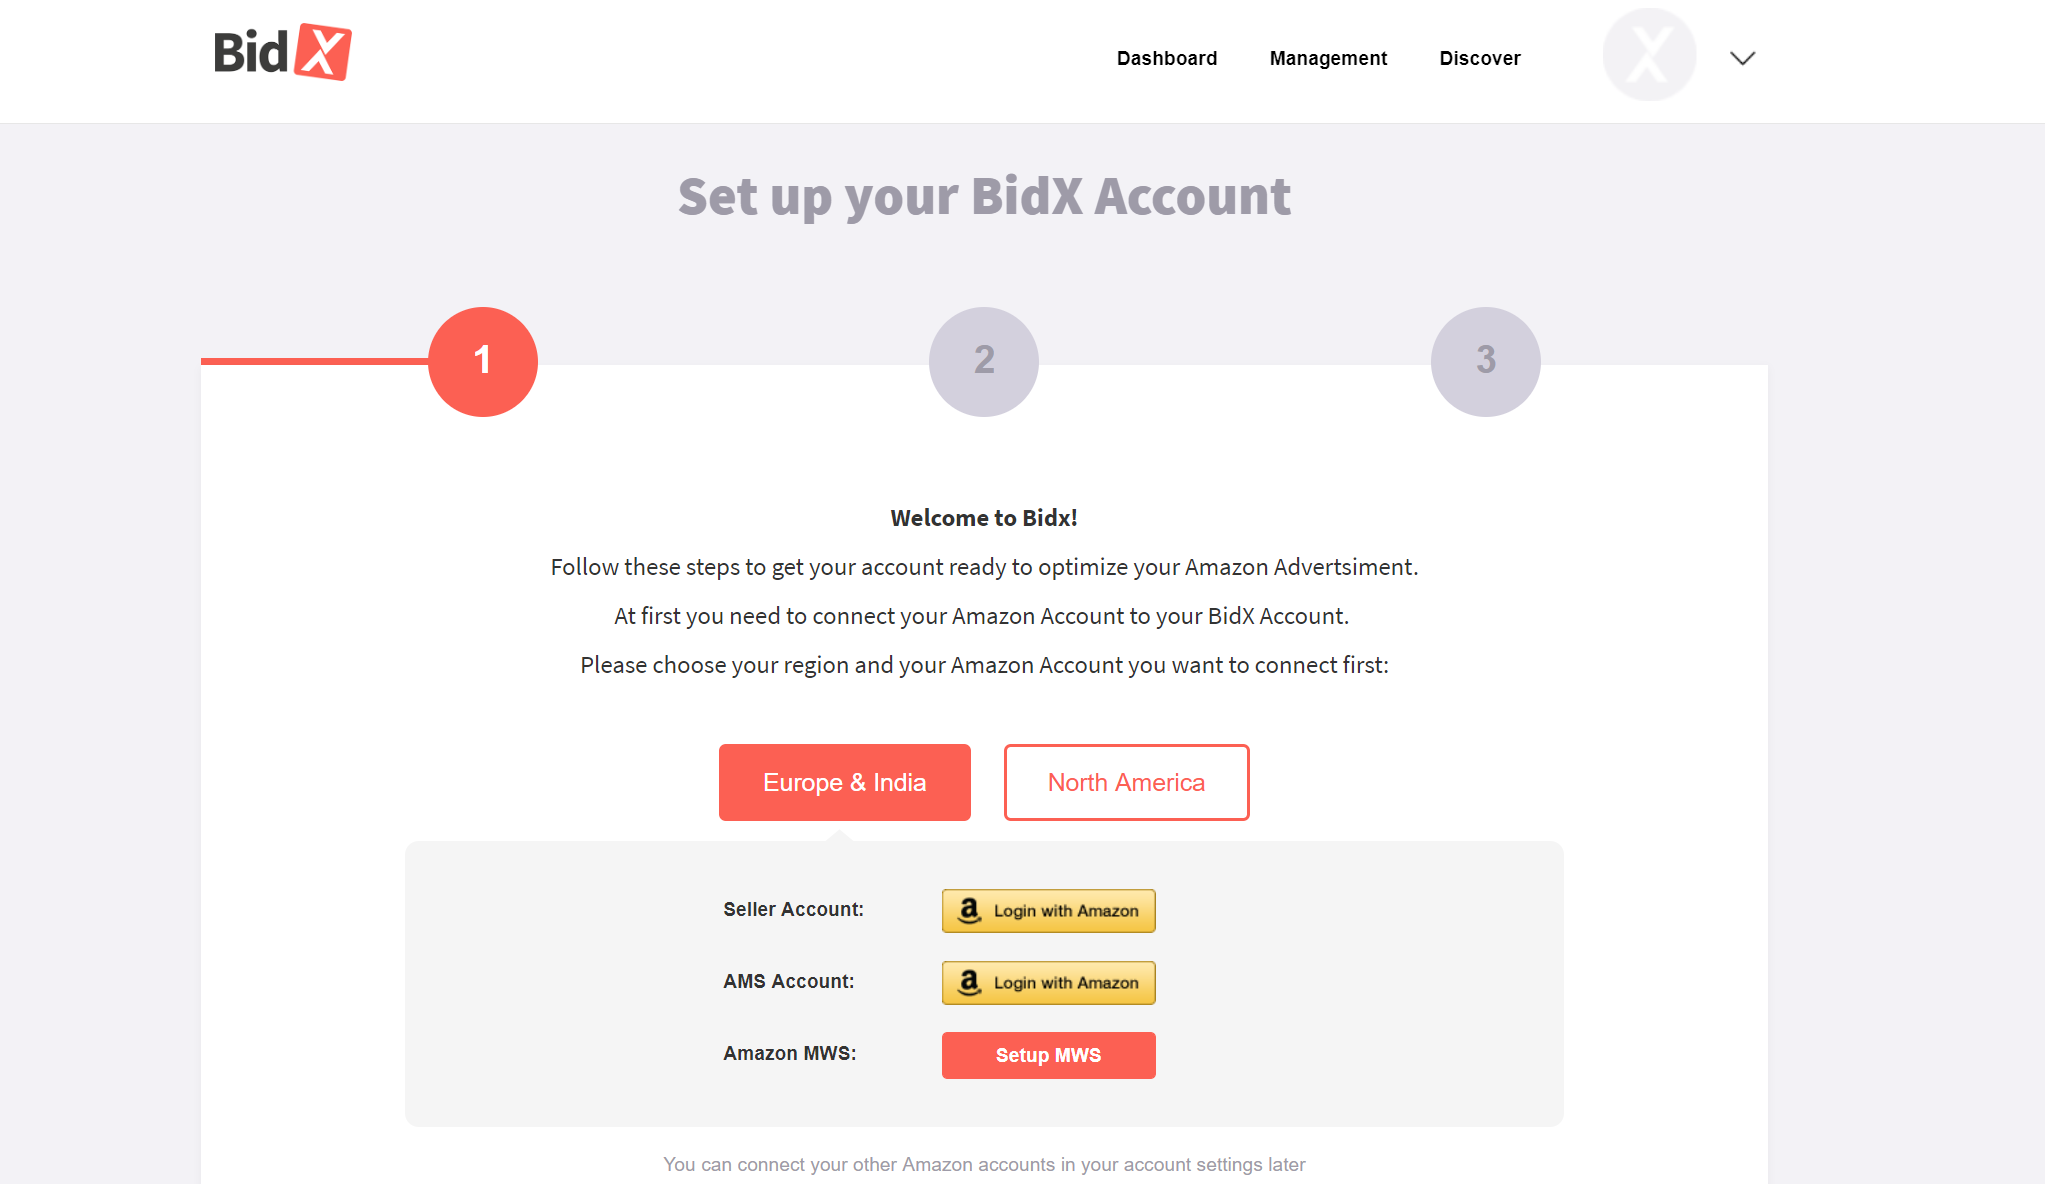
BidX PPC Account Setup
3. Your Dashboard
After setup or after logging in to BidX, you will first see your dashboard. It provides you with an overview of your account and visualizes how your performance has progressed over time. The values and graphics refer to all your PPC advertising campaigns that are running on Amazon (SPA and SB). The dashboard itself is basically divided into three areas:
- a Performance Chart,
- your Advertising KPIs
- your Account KPIs
Your Performance Chart
On the performance chart, your ACoS and sales for the last 30 days are displayed by default. The last three days are not taken into account, as Amazon validates sales and clicks during this time and removes fraudulent clicks if necessary. You can change the two parameters displayed to the left and right above the graphic. This allows a direct comparison of different values so you can see potential interrelations at a glance. Additionally you can change the time period as you like. Once you've connected the Advertising API, your data from the last 60 days can be consulted as well.
The continuous line represents the average of the last seven days while the dotted line shows your daily value. In order to provide an even more precise overview, you can filter by marketplace in the upper right corner. This allows you to track each country's development individually from one another. We plan on not limiting the selection only to the marketplace, but also to enable filtering according to campaigns and products as well.
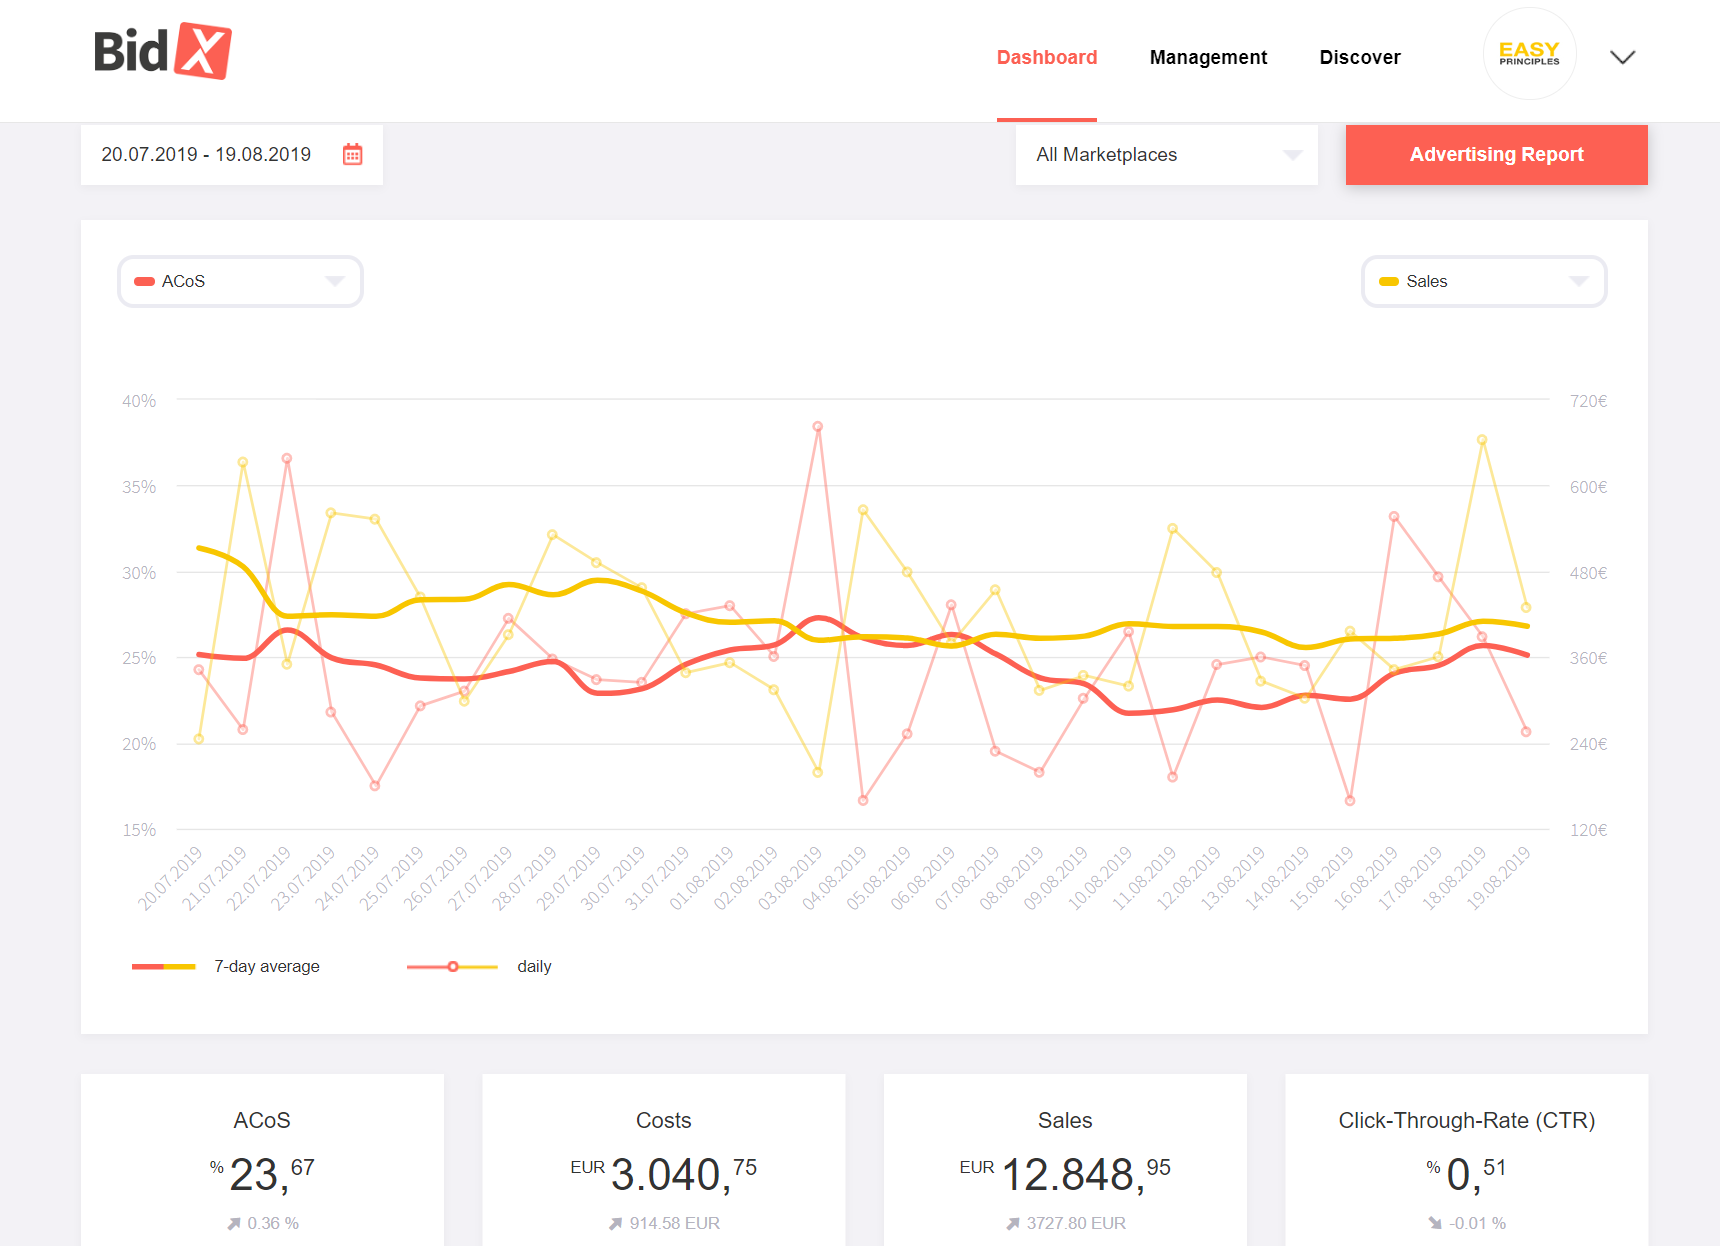
Your Advertising Key Performance Indicators
This chart shows you the most important advertising key indicators (Ad KPIs). They provide a further summary of sales results generated by your PPC campaigns. All figures shown here refer exclusively to the sales and costs generated by your advertising. All values are based on the period defined in the chart. The small grey number below the respective KPIs with the up or down arrow shows the difference to the previous period. If you have currently selected the last 30 days, the previous period refers to the performance from 31-60 days ago.
How to calculate your Ad KPIs:
- Advertising Cost of Sale (ACoS): Is calculated based on the division of costs of sales and is the parameter for the efficiency of PPC campaigns. ACoS = Advertising Costs / Advertising Revenues
- Conversion Rate (CR) = Conversions (orders) / Clicks
- Cost-per-Click (CPC) = Advertising Costs / Clicks
- Click-Through-Rate (CTR) = Clicks / Impressions
- Cost-per-Sale (CPS) = Sales / Conversions
- Return of Advertising Spend (RoAS) = Advertising Revenues / Advertising Costs
Key Performance Indicators for your Account
In the lower red area we provide you with an overview of your account details. For example, the active keywords (paused keywords do not count as active keywords) and the number of adjustments that have been made to your account since you started BidX can be seen.
4. Management
In our Management tab you can change all the parameters for the automated setup. This tab is divided into Product Management and Automation & Rules.
4.1 Product Management
In the Product Management section you will find an overview of all your products. If some products are not yet displayed, it is possible that the MWS interface is not yet connected by your account settings. It is only with the MWS interface that BidX can access all products from your account and not only those that have already been advertised. Likewise, the full title is often loaded only by connecting the MWS interface.
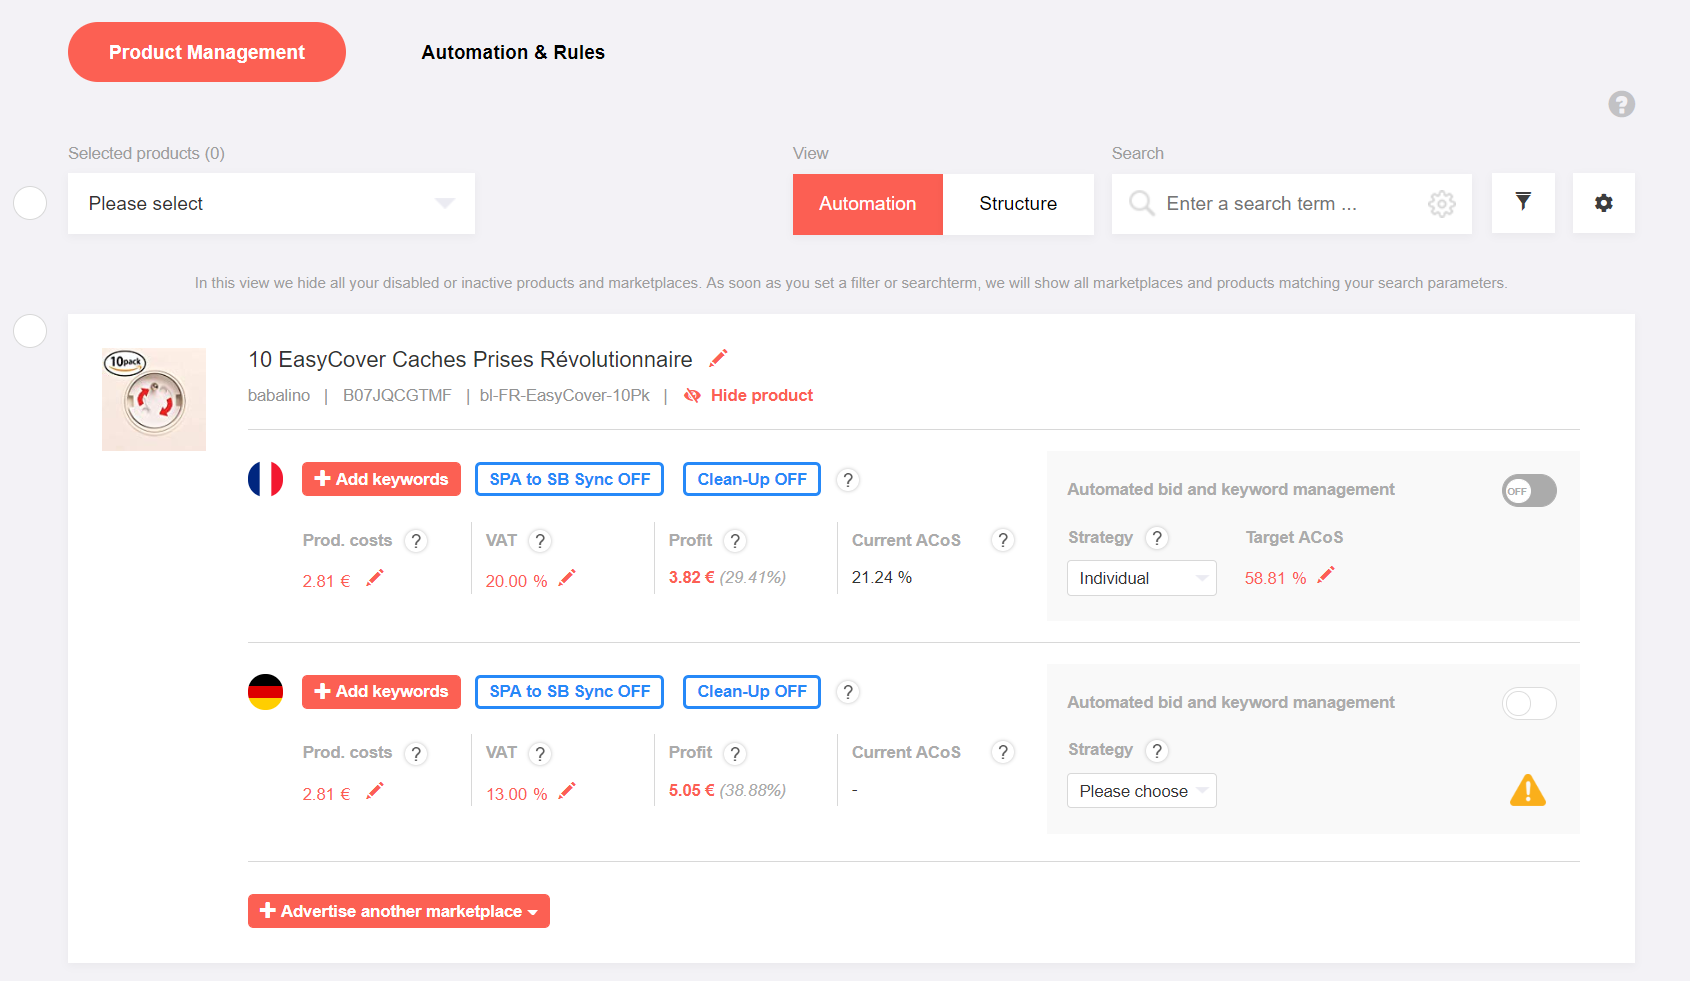
Product Management is split into two views:
- Automation (default) and
- Structure
The Automation view provides you with an overview of the current settings for each product. Likewise, if the MWS interface is connected, the production costs (in the current currency), as well as the VAT percentage can be added. Given that the product is available, our system then calculates potential margins and you can choose from various options which margin you want to achieve, for example break even. An alternative would be to define an individual target ACoS and activate the automation via the switch.
The Structure view provides an overview of the existing ad groups for a product. They also provide the basis for the average ACoS in the Automation view. The view is basically divided into the columns of the different match types. If the display groups are not automatically recognized, the selection can be made manually using "Select display groups". Under " Select ad groups " you will find all the ad groups connected with this product. This combination represents the basis for the keyword management, i.e. the search terms from the automatic ad group are transferred to the manual ad groups and the corresponding negative keywords are set at the same time.
Add Keywords
If you select "Add keywords", the keywords with the corresponding match type will be inserted into the ad groups stored in this field. If you select "Create structure and add keywords" while saving, any missing campaigns and ad groups will be created. This is particularly useful when it is the first time that a product is advertised.
PRO Features
The blue PRO features are initially disabled. An activation can be requested by appointment or by chat. The Pro Feature opens up the possibilities of clean-up as well as import and export for bulk operations.
Only one match type should be used in each ad group. This means that in the campaign structure a broad group of ads actually contains only broad keywords. The same applies to phrase and exact.
With our ''clean up'' service, you can now ensure that this is always the case for your ad groups. "Clean up" clears up your ad groups by, for example, transferring an exact keyword, which was wrongly assigned to a broad ad group, to the correct exact ad group.
In addition, the respective negative keywords are set. If, for example, you have set a wide ad group and an exact ad group, but no negative keywords yet, the keywords of the exact ad group in the wide ad group are set to negative exact. Equivalently, this applies to phrase.
With import and export, it is easier than ever to edit the alternative title, cost, VAT, target ACoS values, as well as to activate clean-up or automation itself. This is done by setting "0" - deactivated to "1" - activated within the XLSX file.
Further features of our Product Management tool are described in detail in our separate blog article about Product Management.
4.2 Automation and Rules
On the second page of the Management Tab, the individual automations can be viewed. Automation and individual rules can be created and edited here. They can be used to regulate optimization on a campaign basis. All automations that were automatically created in "Product Management" via "Automatic bid and keyword management" can also be found in the ''Automated SKU Rules'' folder (the automations from Product Management are not displayed to speed up loading times).
Add Automation (Popup Modal)
The button "+ New Automation" opens a popup to create an individual automation for a specific campaign. Automations also serve to control the sponsored brands.
Automate your PPC-Management
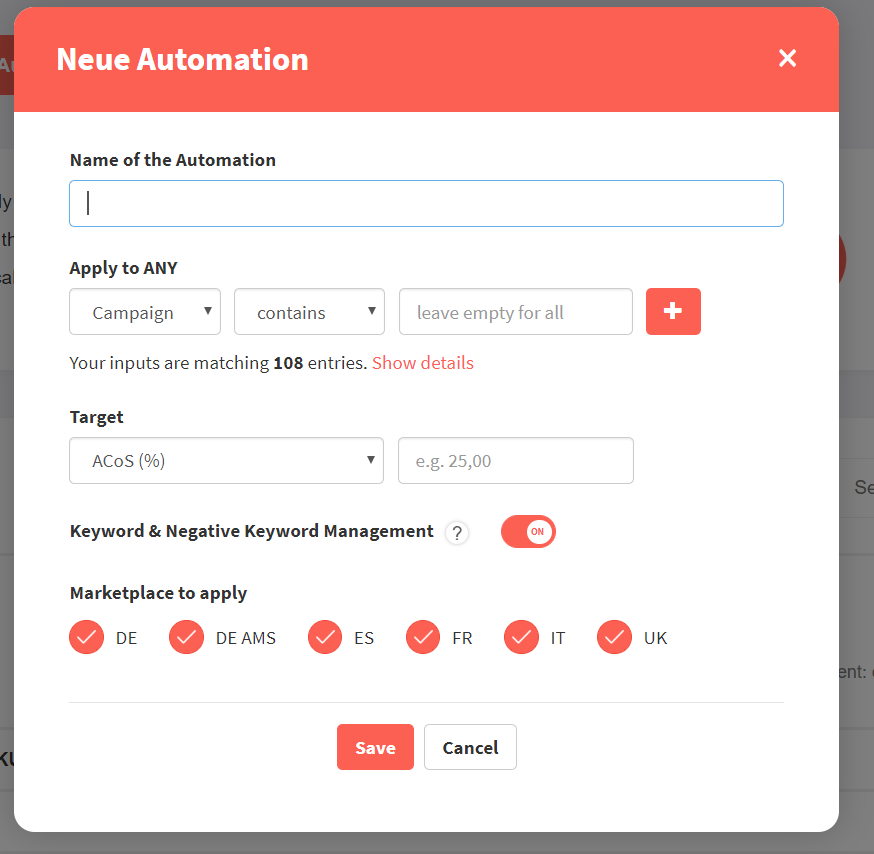
It is possible to limit the automation to a specific campaign, ad group or keyword. To do this, select the respective type, a match type and enter the name of the campaign or ad group in the input field. If you leave the input field empty, the automation will be applied to all campaigns. The plus sign on the right margin allows you to add further conditions. The link is based on the OR logic, i.e. the automation is applied to campaign A OR to campaign B. Details displays show to which campaigns the automation is applied.
The next step is to select the target value that determines the direction for the optimization. As with any service, we cannot guarantee that this target value will be reached 100%.
Target-ACoS (%): Here you can select a target ACoS to be reached. If, for example, 20% is to be your target ACoS, enter "20" here.
Note: We do not adjust the budget of campaigns. This remains the budget limit and is not changed by BidX.
The next step is keyword automation. If this is activated, well-performing search terms, for example, will be transferred from the automatic ad group to the manual ad groups. It is important that you have correctly stored the corresponding ad groups of your products in the ''Structure'' view of Product Management.
Finally, you select the marketplaces for which you want to apply automation and the first automation is ready. From now on it controls the campaigns, ad groups and keywords according to your settings. These adjustments take place every night.
You can make adjustments in automation only after a certain amount of statistically significant data has been entered. You can find out what this means, for example, for the number of clicks in our blog post on economic clicks. Read more about automation in the section below.
Besides our automated solutions it is also possible to create individual rules, in which you can define the conditions for the optimization yourself. When using the standard optimization, however, we strongly advise against it, since incorrect use can cause great damage. For more information on how to use the individual rules, please contact our support or make make a phone appointment.
You can organize all automation and individual rules in folders for a better overview. For this the elements can be moved easily by Drag'n'Drop. An important factor here is the order, as it determines the priority level. If a rule or automation applies to several campaigns or ad groups, only one automation or rule will be applied at a time, namely the one with the highest priority, in other words the rule or automation that is highest on the list.
The symbols on the side of an object allow you to duplicate, pause, edit or delete it. All elements can be found using the search function and can also be exported or imported.
Rules Log
The rule log is located under the automations. It displays the number of changes made on a daily basis and for each country. Clicking on 'Details' takes you to a more detailed view that can be filtered and sorted. This view is again subdivided into the following:
- Bid adjustments and
- Structural adjustments
Looking at the bid adjustments, you can see which keyword bids have been changed, by which value they have been changed, which automation was responsible for this and why the change was made.
5. Discover
Discover allows you to see all campaigns placed in Seller Central or the Advertising Console. You also get a direct overview of the performance of each individual country.
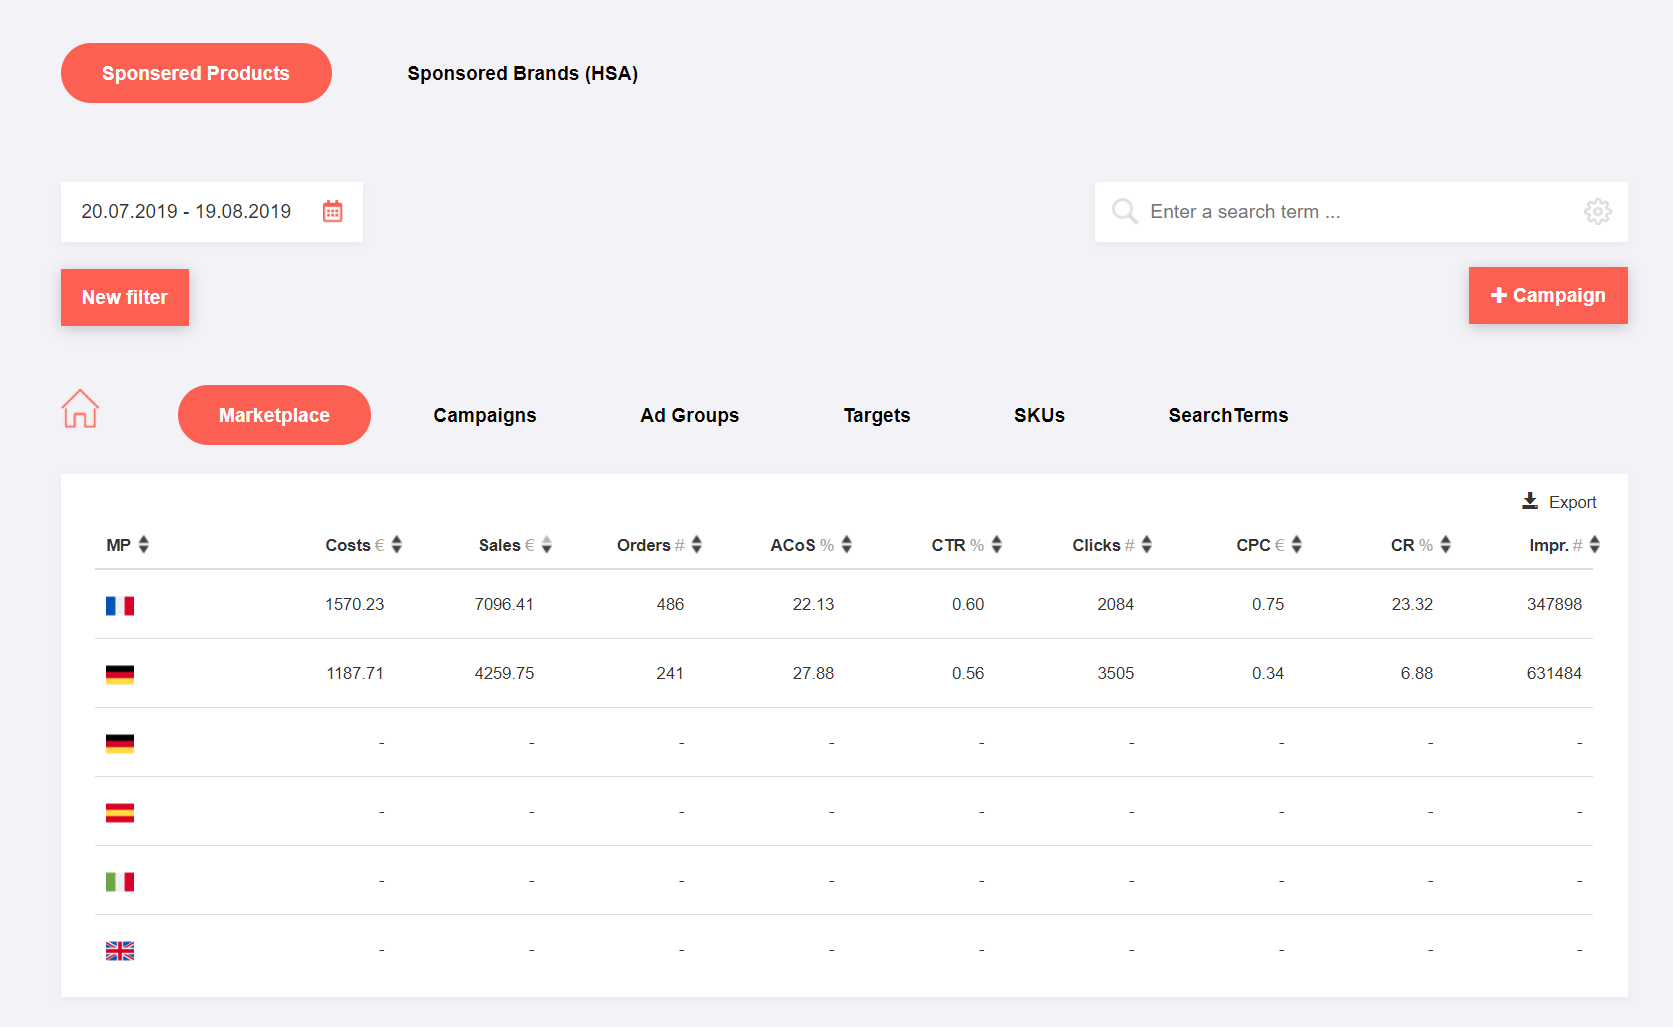
The overview at the top left can be used to differentiate between sponsored products and sponsored brands. Any timeframe can be selected for examination. The current view can also be searched and filtered. In the search you can use the wheel to differentiate whether the search term should only be contained, or whether the search term exactly should be searched.
The individual columns can be sorted in ascending or descending order. All elements such as the campaign name, bids or budgets can be edited using the small red pencil. Search terms that contain an ASIN are marked in red and, if clicked, lead directly to the corresponding listing on Amazon.
6. Settings
The settings can be accessed using the small arrow at the top right. All central settings regarding your connectivity to Amazon and your subscription settings can be made here.
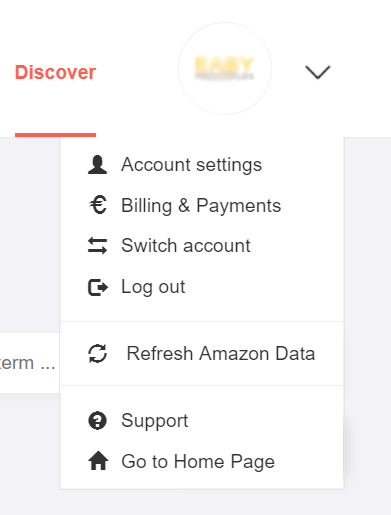
Account settings
The Seller-Login applies to all merchants and FBA customers who advertise through the Seller Central. The login for the Advertising Consoleapplies to vendors (or vendor express participants) or customers who control their advertising via the Advertising Console.
In addition to the authentication of your advertising, you can also activate the MWS-API here. With this you can see the costs, titles and all products that are new or have never been advertised in BidX. The MWS interface is only available for sellers.
Subscription settings
In the Subscription Settings, you can select which plan to use if you have not already done so. If the amount of 15.000 EUR per month is exceeded, it is best to contact our support via the chat in the bottom right corner. We then can work out a contract with individual conditions based on the amount of your desired advertising expenses.
You can also manage your active subscription in these Settings. Invoice and payment data can be edited and all previously created invoices can be downloaded. Your subscription can also be cancelled here.
Logout
This logs you out. We recommend that you always do so, especially if you are working on a foreign or public computer.
Reload Amazon Data
BidX downloads all your new campaigns one time a day. Newly created campaigns in BidX are transferred directly to Amazon and can be viewed there. With "Reload Amazon Data" it is possible to manually trigger the download of newly created campaigns from the Seller Central or the Advertising Console. Also we check on new suitable ad groups for the product management.
Support
You can always contact us through the chat at the bottom right. In the Support tab you can find more contact possibilities. You can contact us also by Mail at hello@bidx.xyz. We can be reached by telephone from Monday to Friday from 10:00 am - 5:00 pm. If you have larger questions, you can always clarify them in a personal meeting.
Back to Homepage
This menu item takes you back to our homepage. In particular, this is useful to access the articles from the blog. In our blog we regularly update you about new features at Amazon, news at BidX and the latest tips and tricks.
-2.png)